Gains Setup
The Gains Setup page is used to assign the gains and thermostat to the spaces for the TM59 assessment. The assignments are setup using data entered into the 5 different worksheets available from this page. These worksheets can be switched between using the tabs in the bottom left corner of the wizard.
The five worksheets are:
Zones Worksheet
Occupancy Worksheet
Equipment Worksheet
Thermostat Worksheet
Schedules Worksheet
1. Zones Worksheet
The Zones worksheet is the main worksheet and is used to determine the data to be used when creating the unique internal condition for each zone.
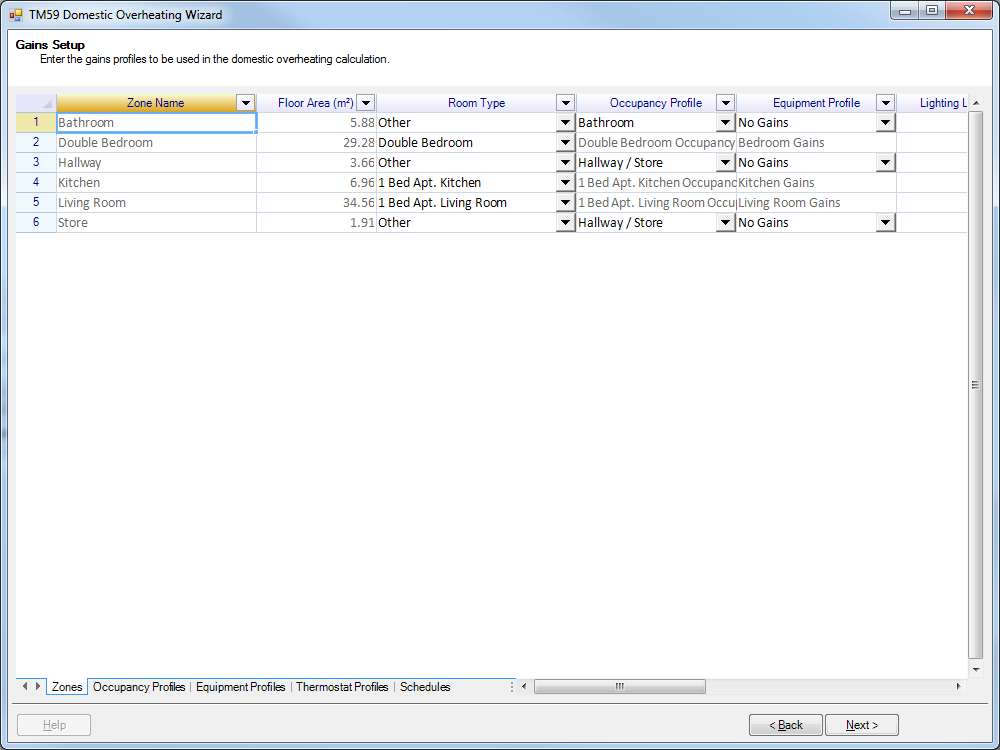
Each zone in the TBD, provided it is not an external zone, will have its own unique row on this worksheet, while the columns are specific fields related to the zone. These fields are:
Zone Name
This field just reports the zone’s name. This is a read-only field, so it cannot be edited.
Floor Area
This field reports the floor area of the zone in m². This is a read-only field, so it cannot be edited.
Room Type
This field is used to set the room type of the zone as per Table 2 in TM59. The room types in TM59 are used to dictate the Occupancy and Equipment profiles, while also determining which criteria the zone will be assessed to. The available room types are set using a drop down menu listing the available options, along with an ‘Other’ option. This ‘Other’ option should be used for zones which don’t fit in with the prescribed room types, for example Bathrooms, or when bespoke profiles have been agreed upon.
Occupancy Profile
This field reports the occupancy profile applied to this zone. Most of the time, this will be a read-only field as the occupancy profile is determined by the Room Type. However, if the ‘Other’ option is selected for the Room Type, then a drop down will appear here allowing the user to choose from any of the Occupancy profiles found on the Occupancy worksheet.
Equipment Profile
This field reports the equipment profile applied to this zone. Most of the time, this will be a read-only field as the equipment profile is determined by the Room Type. However, if the ‘Other’ option is selected for the Room Type, then a drop down will appear here allowing the user to choose from any equipment profiles found on the Equipment worksheet.
Lighting Load
This field is used to enter in the lighting load of the zone, in W/m². TM59 states that 2 W/m² should be assumed as the default lighting load, however this default should be changed for existing buildings or for buildings using a specialist lighting design.
Lighting Schedule
This field is used to place a schedule on the lighting to determine the hours the lighting will be on. TM59 assumes that the lighting will be on between 6pm and 11pm, and the default schedule TM59 Default Lighting Schedule will operate between 6pm and 11pm. However, using the drop down menu applied to this zone, this default schedule can be changed to any schedule on the Schedules worksheet.
Infiltration
This field is used to account for infiltration into this zone. The Infiltration field uses units of ACH.
Ventilation
This field is used to account for any mechanical ventilation into the zone. Please note that the ventilation field uses units of ACH.
Ventilation Schedule
This field is used to place a schedule onto the ventilation to determine the hours the ventilation will be supplied to the zone. The application of the schedule is done using a drop down menu, with all available schedules in the drop down menu coming from the Schedules worksheet.
Heating Thermostat
This field is used to apply a heating thermostat to the zone, to determine which temperature the zone will be heated up to. The heating thermostat is set using a drop down menu, listing all of the thermostat profiles listed in the Thermostats worksheet.
Cooling Thermostat
This field is used to apply a cooling thermostat to the zone, to determine which temperature the zone will be cooled down to. The cooling thermostat is set using a drop down menu, listing all of the thermostat profiles listed in the Thermostats worksheet.
Pipework Heat Loss
This field is used to account for any pipework heat loss in the zone, which should be modelled as per the guidance in TM59. The heat loss is entered into this field in W. Please note that in the internal condition, the heat loss is added into the Sensible Equipment gain.
Report Criteria
This field is used to determine which report criteria the zone will be assessed against. If the Mechanical Ventilation option is selected, the zone will be assessed against the criteria for mechanically ventilated homes. If the Natural Ventilation option is selected, the zone will be assessed against the criteria for naturally ventilated homes.
Wind Speed
This field is used for account for any ceiling fans that may be present in the zone. The TM59 document states that the modelled air speed in a space must be set to 0.1m/s unless ceiling fans or other means of reliably generating air movement are present.
This value should not exceed 0.8m/s.
Note
This field was added in Tas v9.5.4
2. Occupancy Worksheet
The Occupancy worksheet is used to setup the occupancy profiles to be used for the TM59 assessment.
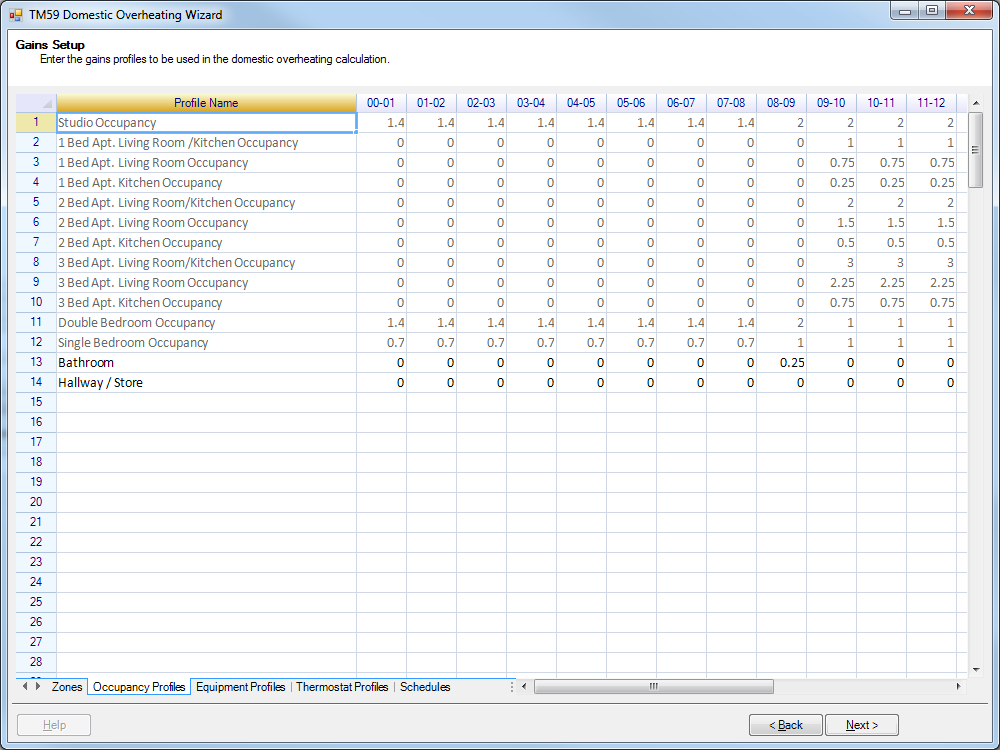
Each row of the worksheet is a unique occupancy profile, with the first column stating the name of the profile, while the remaining columns are used to set the number of people in the space at a given hour. The column headers can be used to check which hour a column is modelling. For instance the column with header “14-15” is modelling the hour between 14:00 and 15:00.
While the worksheet takes number of people as an input, it does allow for decimals to be entered due to the fact that some spaces are modelled with partial occupancy gains. For instance, bedrooms during the night hours only operate with 70% gains from occupants. To account for this, you would enter in 0.7 into the fields for these hours.
By default, all of the occupancy profiles that are listed in Figure 1 of the TM59 document are added by the wizard. These profiles are read-only so they cannot be edited. However, as per the TM59 guidance, bespoke profiles can be created and used for a TM59 assessment. To create a bespoke profile, just enter the profile name and occupancy values into the next free row on the wizard. Please note the name of the bespoke profile cannot be the same as another profile or schedule on any worksheet. Also all hours must have an entry in for the occupancy, or otherwise you will not be able to progress past the Gains Setup page.
3. Equipment Worksheet
The Equipment worksheet is used to setup the equipment profiles to be used for the TM59 assessment.
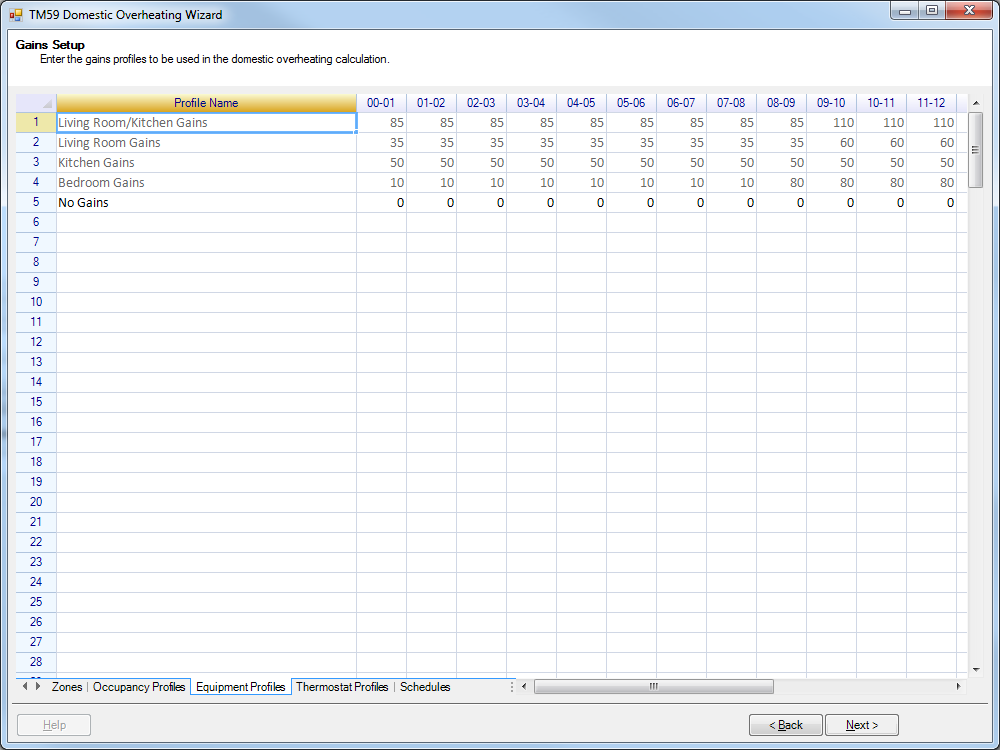
Each row of the worksheet is a unique equipment profile, with the first column stating the name of the profile, while the remaining columns are used to set the equipment gain in the space at a given hour. The column headers can be used to check which hour a column is modelling. For instance the column with header “14-15” is modelling the hour between 14:00 and 15:00.
The values entered into the worksheet for the equipment profile is the equipment load for the hour, in Watts.
By default, all of the equipment profiles that are listed in Figure 1 of the TM59 document are added by the wizard. These profiles are read-only so they cannot be edited. However, as per the TM59 guidance, bespoke profiles can be created and used for a TM59 assessment. To create a bespoke profile, just enter the profile name and equipment loads into the next free row on the wizard. Please note the name of the bespoke profile cannot be the same as another profile or schedule on any worksheet. Also all hours must have an entry in for the equipment load, or otherwise you will not be able to progress past the Gains Setup page.
4. Thermostat Worksheet
The Thermostat worksheet is used to setup the thermostat profiles to be used for the TM59 assessment.
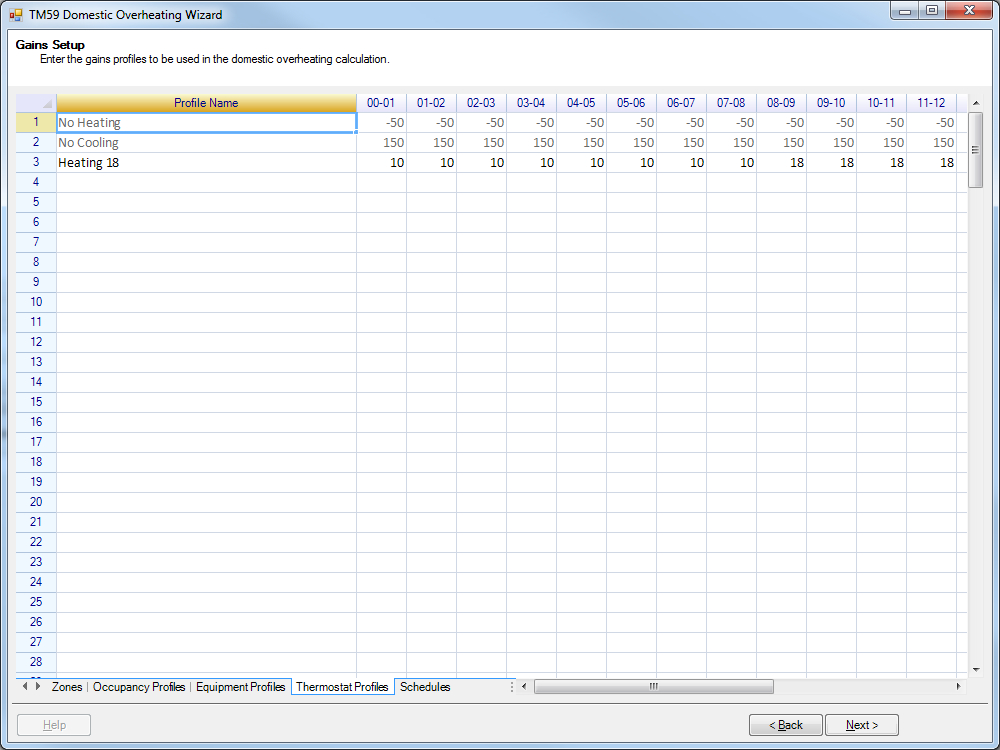
Each row of the worksheet is a unique thermostat profile, with the first column stating the name of the profile, while the remaining columns are used to set the temperature the space will be heated or cooled to in a given hour. The column headers can be used to check which hour a column is modelling. For instance the column with header “14-15” is modelling the hour between 14:00 and 15:00.
The values entered into the worksheet for the thermostat profiles is the temperature the space will be heated or cooled to in Celsius. These profiles will be applied to the, upper and lower limits of the thermostat in the zone’s internal condition. Due to this, the wizard will only accept values in the range -50°C to 150°C.
TM59 does not come with any explicit guidance on modelling heating or cooling within the building. However as some of the overheating criteria are annual comparisons, the effects of heating systems can have an impact on overheating in the spring / autumn, so it is recommended to model these heating systems. The wizard by default creates two thermostat profiles which model no heating and no cooling respectively. To create a bespoke thermostat profile, just enter the profile name and temperatures into the next free row on the wizard. Please note the name of the bespoke profile cannot be the same as another profile or schedule on any worksheet. Also all hours must have a temperature entered, or otherwise you will not be able to progress past the Gains Setup page.
5. Schedules Worksheet
The Schedules worksheet is used to setup the schedules that can be applied to the lighting and ventilation fields for the TM59 assessment.
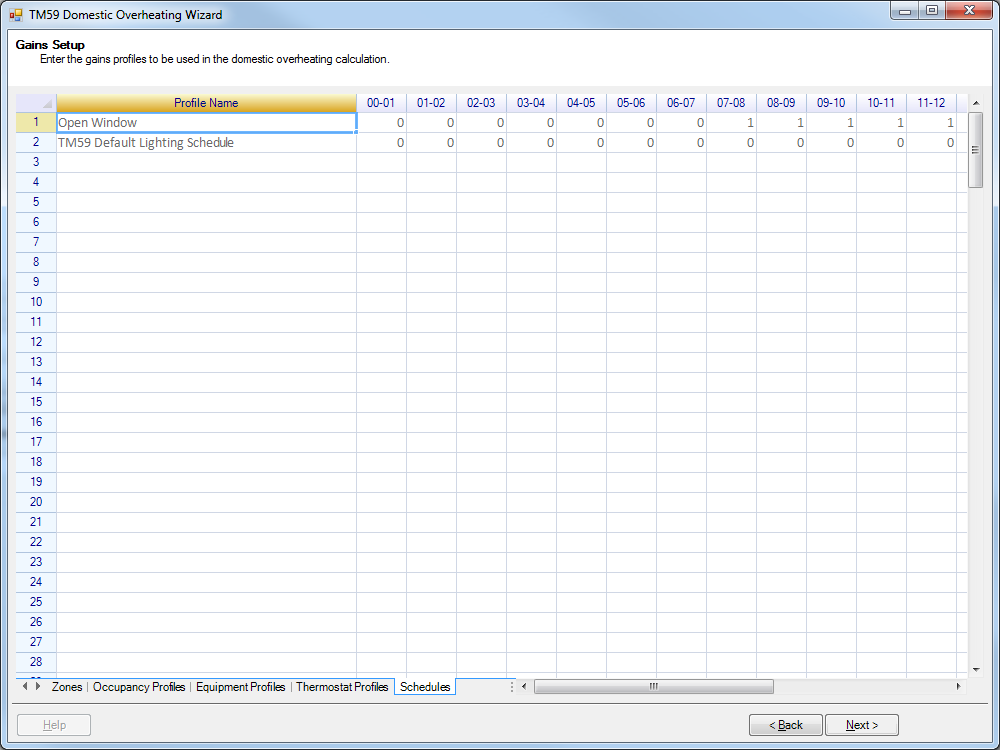
Each row of the worksheet is a unique schedule profile, with the first column stating the name of the profile, while the remaining columns are used to set the schedule’s value at a given hour. The column headers can be used to check which hour a column is modelling. For instance the column with header “14-15” is modelling the hour between 14:00 and 15:00.
The schedule profiles operate by taking values greater than or equal to zero. When the schedule is applied to a field, the value entered here will be multiplied against the lighting load or ventilation for the zone. So, for instance, a value of zero will mean there is no lighting or ventilation in the zone. While a value of 0.5 will mean the zone will have a lighting load of half the entered value.
By default, the Lighting Profile in Figure 1 of the TM59 document is added to the Schedules Worksheet automatically by the wizard. Also, if the source TBD file has any schedules, these will also be added automatically by the wizard. The profiles added automatically are read-only so they cannot be edited. To create a bespoke profile, just enter the profile name and schedule values into the next free row on the wizard. Please note the name of the bespoke profile cannot be the same as another profile or schedule on any worksheet. Also all hours must have an entry in for the schedule, or otherwise you will not be able to progress past the Gains Setup page.
Copy & Pasting
Data can be copied and pasted from the worksheets by using the keyboard shortcuts Ctrl+C and Ctrl+P. When pasting data in, you might find that an Error and Warnings dialog appears.
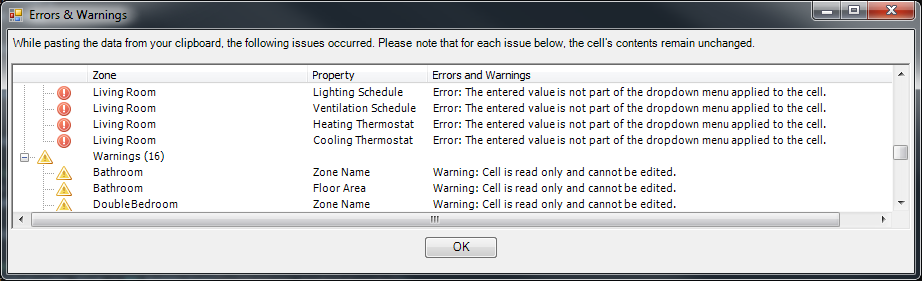
The Errors that appear in the dialog occur when the data you try and paste into a cell isn’t an applicable option (e.g. trying to paste the word “cat” into the lighting gain field). Warnings will occur when you try and paste over a read only cell. In either case the original data will not be amended. With both the errors and warnings, the zone and property affected are listed, along with a short description of the problem. Please note that these same errors and warning will appear as a message box if you just try to change the contents of one cell, they are not exclusively used while copy and pasting.